Thursday, October 22, 2015

One more board!

Ok, it has been nice to take a little break from the island project(s). I have been so focused on finishing the deck, I have been driving myself crazy for months. Made it up to the island for the first time in 3 weeks. My plan was to make ONE FINAL STOP at Menards for the remaining deck material to finish the back steps and the back bar top. Then return any left-over material back to Menards on Sunday, once and for all!

Friday, I stopped on my way west and picked up the stairs stingers, 14 ft thick deck for the stair treads, and other miscellaneous lumber for the stairs. Loaded up and got on the ferry.

Chris brought me a load of gravel to finish off the back of the driveway and fill-up to the left side of the front deck stairs. You can see the curved approach in the photo below.

Driveway gravel fluff

Before it got too dark, I was able to set one 4x4 post in the ground in preparation for the back stairs...

Saturday morning, I got an early start and set the LAST 4x4 post for the entire deck project. For those of you keeping track, I think that makes it 34 total posts. Just to put that into perspective, even if you are really good (and I'm not), it takes at least 1/2 hour per post to dig, level, re-dig, re-level, drop in the dry concrete and then plumb the post. In reality, this is probably way over 20 hours.

So...

All posts done, good!

On to the stairs...

Take a measurement...

Holy sh-t!

I bought all of the stair material for a 14 ft span because that is what I thought I needed. It turns out, the stair opening is 15ft! I am now screwed!

I was ready to "call it a day" and forget the deck for the weekend, because there was no way I was loading it all back up and going to Menards again. Luckily, Chris had Winston working for us this weekend. After a little convincing, I sent Winston on his way to catch the 9:30 am ferry, destination - Menards and back!

While I waited for the proper sized deck material, I got cracking on the back deck bar top. Below, you can see a photo of this finished product. Just need some outdoor bar stools.

deck bar

Winston made it back to the island around 1:00 pm I think. Time to get moving on the back steps. Here is a photo of the progress below:

back stairs underway

By 5:00 pm it was time to go to Ron & Sandy's barn for a clam bake.

Sunday morning, I made the push to get it done. I rock-n-rolled on the stair treads, side railings and spindles. Just when I thought the sun was shining bright and I would be done soon, I noticed that the last 15ft deck board to be used for the final stair tread had a few saw cuts in it. Someone had returned this board to Menards and when Winston picked it up the day before, he didn't notice.

back stairs

So, I proceeded to clean-up the mess of remaining scrap wood and load up the truck with all returnable material and headed to Menards once again...

Final progress photo when I left on Sunday.

progress photo
Next steps:
  • Finish the back steps - one more board!

Tuesday, September 29, 2015

Family-Fall-Fun

After taking last weekend off for my mom's retirement party, it was time to get back at the never ending island project(s). Of course, I made my mandatory stop at Menard's in Sandusky on the way up to the island for more materials. I seriously cannot express in words or emphasize enough on this blog what an absolute hassle it is to have to stop/shop for materials (and then go back to return materials) every weekend and sometimes more! In comparison, the actual work on the cottage really isn't as bad as just getting the stuff onto the island!

Anyway, the glass is definitely "half-full"...

The weather was absolutely fantastic. 75 and sunny all day and then cooler in the evening. Very nice indeed. Saturday afternoon, Captain Ron hosted a party for the Buckeye's Game. Here is photo of me and my oldest baby girl. Typical barn party in the KI hood with the neighbors.

Anna and me

Earlier on Saturday, Bon took the kids downtown to the Harvest Festival while I worked on the deck.

Anna and Bonnie

All weekend I worked on finishing the front side spindles and then mostly on front stairs. One night, I hung a new towel hook bar in the master bathroom. This was more of a decision based on function rather than style because we need a place to hang bath towels and there is no wall space available, so this was the best solution.

Master bath room towel hooks

Installing these desk stairs is a three step process. #1 is setting the ground posts, #2 is building the stairs (stringers and treads) and #3 is building the hand rail and spindles. The photo below is right in the middle of step #2. It's kinda hard to notice, but look for the trench next to the bottom post. This is a critical part that is no fun whatsoever. This has to be hand dug and made level to allow for the bottom plate (2 x 6 x 10) of the stair stringers to rest upon. You can't see it in the finished stairs because it it buried. This was particularly difficult to dig because it was technically part of the drive way space and it was covered in gravel on top of concrete screenings that has been compacted for close to 5 years. I was like trying to dig into hard concrete.

Front stairs underway

Here are the finished front stairs late afternoon on Saturday. These a super solid, very happy with the results.

Front stairs done

You can really see the overall size and foot print of this massive deck from the driveway and the street now as shown below.

From driveway
From street

Here is the same photo, from the same spot, that I try to keep for time lapse purposes. The only new progress here is to the far left where you can see the front stairs now in place.

Progress photo

We decided to build a 12 ft bar top on the deck railing section facing the fire pit. I have a preliminary plan in mind, so keep tuned for more

Next steps
  • Back steps
  • Deck bar top

Monday, September 14, 2015

Working weekend

This was a solo working weekend for me. No family and kinda boring. Nothing really great to share just more deck work. Here is where I left off on Sunday morning...

Side stairs done

I was able to finish the side stairs and install all of the remaining balusters/spindles I had on the island. On the front facing side of the deck, I got all the way around to the side and ran out of material. I'll probably need about 50 more spindles to finish that side and the two remaining sets of stairs.

I really like the detailed look of the side stairs as shown in the photos below. The beefy handrail really make the railing super solid. This is the same style I will use on the front and back stairs.


Another long side deck photo showing the finished stairs.


Here is photo showing the finished (mostly) spindles on the front section. You can also see, I set two 4x4 posts to be used for the 10 ft wide front stairs. Not too exciting, but I hate digging/setting posts so I wanted to capture the progress.


This blog has been very boring and just focused on finishing this colossal deck project. I am hoping to share some more exciting stuff soon.

Other items finished this weekend include: touch-up paint and caulking around some door and baseboard trim, organizing both the utility closet and shed, and installing ALL of the remaining indoor door knobs and lock/sets. Unfortunately, none of those items are photo worthy.

Next steps:
  • Build front stairs

Wednesday, September 9, 2015

Labor day weekend with the family

Big fun, big family holiday weekend. My mom came up and booked a few nights at the Venture Resort. The kids love the pool and stayed with her in the suite.

I put in a few 1/2 days working on the deck and made progress on the side stairs, deck railing cap and spindles. Here is where I left in Monday (Labor Day) afternoon.

Side stairs

Check-out the view from the Venture suite. We spent some quality time hanging out at the pool.

Venture resort - view from balcony suite

Next steps:
  • Finish side stairs
  • Top railing cap
  • Spindles

Tuesday, September 1, 2015

First solo weekend since April

I had to keep rolling on the deck project this past weekend since this is taking way longer than anticipated. To my dismay, I had to stop at Menards on the way up to return lumber and buy more. My list included a few 16 ft 2x4s. However, my truck is way to small to handle that overhang, so I had to open my back window and slide them through to the cab. Here a live dash cam photo below.

Lumber in my face

After leaving work late and spending hours messing around at Menards, I finally caught the 9:30 pm ferry. So I didn't do anything on the island Friday night other than unload. Bright and early Saturday morning I started on the railing framing.

By early evening, I had finished the railing framing and it looked like this...


Sunday morning, I started on the balusters (spindles). I had to figure out how to space these properly. I built a jig using a few modified 2 x 4 scrap pieces. This created a block spacing template that I can use to hang the balusters perfect every time. By Sunday later afternoon, I had the back of the deck balusters finished.


Here is where I left off on Sunday evening before I headed to the ferry dock.

Long side view

Full frontal

Next steps:
  • Finish balusters
  • Install top railing cap
  • Start on the stairs

Wednesday, August 26, 2015

Kids back in school

The kids went back to school earlier this week so this was a true weekend only trip. Bonnie and lil' Neil headed out sometime on Friday afternoon. I got home early from work and waiting for Anna and Sophie to get home from school before we headed out around 4 pm.

Here are my girls on the ferry early Friday evening.

Sophie and Anna on the ferry

The goal for the weekend was to install the deck railing posts. I started on the layout bright and early Saturday morning. I did get some help from the little man as seen in the photo below. 

My boy

By Sunday afternoon, I had layed-out, cut, drilled and bolted 28 railing posts. Here is the finished product.

Posts done

Miscellaneous photos from different views. The stairs you see in the photos are just temporary.


View from the street

Saturday night, Bonnie and me got a chance to head downtown (thanks to Anna for baby sitting the crew) to see our favorite Kelleys Island band - "Almost Famous". They always rock the Caddy Shack.

Bonnie and "Almost Famous"

Early Sunday evening we had to make a mad dash to pack-up and bug-out. Here is the little man on the Seaway Marina beach waiting for the ferry.

Seaway beach

Next steps:
  • Finish deck railing
  • Install spindles (balusters)
  • Layout the stairs (3 sets!)

Tuesday, August 18, 2015

Milestone achieved!

Ok, I realize I have been posting so much about the deck project lately. Apologies for the lack of fun fresh content, but I have been working tirelessly on this for months. Finally, on Sunday afternoon I finished up the last of the wrap-around decking...

Decking finished!

Here is our little guy with another island salamander. He seems to find some new indigenous creature every week. This boy has had some fun this summer!

Neil with island salamander
Bonnie and me were lucky to have Anna willing and able to babysit for us. We went out both weekend nights together. Here is cool photo...

Bonnie and me

Ok, back to deck...

After laying down about 10 more rows of deck (~50 boards), I had to cut the ALL the hanging joists flush using the circular saw. This took a while to measure, mark and cut square. Chris Arnold helped me hang the end boards (the last of the 2 x 10s thankfully!). Then I layed down the final decking early Saturday evening.

Bob Cisar came by on Sunday morning to finish the cut ends using a router to make the deck ends look like a factory finish. Well done sir.


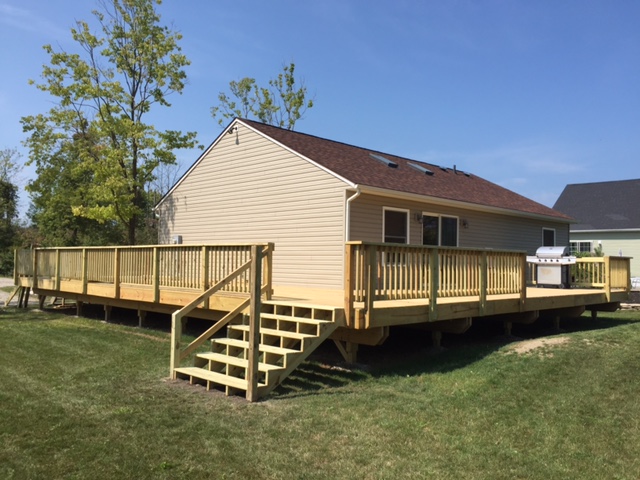
Here is a photo looking at the back of the cottage. It was nice to get the grill off the ground as well.


Next steps:
  • Start on deck railing and stairs